VueJS is one of the greatest frameworks for JavaScript similar to ReactJS. The user interface layer is designed with VueJS, which is simple to learn for any developer. It can also be used with other libraries and extensions.

VueJS is the first choice in my opinion if you want to construct a single-page application. Because there are so many challenges in the development area that cannot be handled by utilizing a single library, VueJS is interoperable with different libraries, so you may easily use it. VueJS is supported by all major browsers, including Chrome, Firefox, Internet Explorer, Safari, and others. This library may easily be compared to your favorite libraries.
Why Vue.js?
- Adaptability: It gives bother free migration, basic, and efficient structure.
- Components: They help in creating custom elements that can be reused in HTML.
- Transition: Various methodologies are given in Vue.js to apply a transition to HTML components when they are included or expelled from the DOM.
- Detailed Documentation: It gives a simple learning curve through point-by-point documentation.
Installation of VueJS: The VueJs can be used in three different ways those are listed below:
- Directly included CDN file.
- Install through the npm.
- By CLI use VueJS
Directly include CDN file: You need to download the VueJS Development Version and Production Version then include it in the script tag.
CDN: For learning purposes, you can use the below script (with the specific version):
<script src=”https://cdn.jsdelivr.net/npm/vue/dist/vue.js”></script>
For production purpose, you can use below script:
<script src=”https://cdn.jsdelivr.net/npm/vue@2.6.11″></script>
For ES modules compatible, use below script:
<script type=”module”>
import Vue from ‘https://cdn.jsdelivr.net/npm/vue@2.6.11/dist/vue.esm.browser.js'</script>
Install through the npm: Before applying this procedure you must have installed npm, to check npm installed or not run the below command:
npm -v
If not, you can install that through node.js installation procedure for:
- Installation of Node.js on Windows
- Installation of Node.js on Linux
Now you are ready to install the VueJS, to do so run the below command. It will install the most updated stable version of VueJS.
npm install vue
By CLI use VueJS: Open your terminal or command prompt and run the below command.
npm install --global vue-cli
Let’s understand with an example.
Project Setup and Module Installation:
Step 1: Vue Router can be installed through Npm with the package named vue-router using below command.
npm install vue-router
// OR
vue add router
It can be used via a script tag as shown below.
<script src="https://unpkg.com/vue-router"></script>
Step 2: Create our Vue project using the following command.
vue create router-page
Step 3: After creating our project we will add our Vue router using the following command.
vue add router
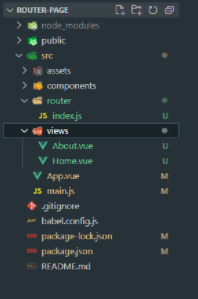
Project Structure: It will look like this.
Example: In this example, we will see how to use routing.
main.js
Javascript
import Vue from 'vue'
import App from './App.vue'
import router from './router'

Vue.config.productionTip = false

new Vue({
router,
render: h => h(App)
}).$mount('#app')
Home.vue
Javascript
<template>
<div class="home">
    <img alt="Vue logo" src="../assets/logo.png">
    <HelloWorld msg="Welcome to Your Vue.js App"/>
</div>
</template>
About.vue
Javascript
<template>
<div class="about">
    <h1>This is an about page</h1>
</div>
</template>
index.js
Javascript
// Requiring module
import Vue from 'vue'
import VueRouter from 'vue-router'
import Home from '../views/Home.vue'
import Profile from '../views/Profile.vue'

Vue.use(VueRouter)

const routes = [
    {
        path: '/',
        name: 'Home',
        component: Home
    },
    // Added our new route file named profile.vue
    {
        path: '/profile',
        name: 'Profile',
        Component: Profile

    },
    {
        path: '/about',
        name: 'About',
        // The route level code-splitting
        // this generates a separate chunk
        // (about.[hash].js) for this route
        // which is lazy-loaded when the
        // route is visited.
        component:()=> import(
            /* webpackChunkName: "about" */
            '../views/About.vue'
        )
    },
]

// Create Vue Router Object
const router = new VueRouter({
    mode: 'history',
    base: process.env.BASE_URL,
    routes
})

export default router
Now let’s add our new route to that application in our App.vue and index.js file. Before we add the new route we need to create our new component named Profile.vue in our views folder.
Javascript
<template>
<div id="app">
    <div id="nav">
    <router-link to="/">Home</router-link> |
    <router-link to="/about">About</router-link> |
    added a new route to our app.vue file//
    <router-link to="/profile">Profile</router-link>
    </div>
    <router-view/>
</div>
</template>
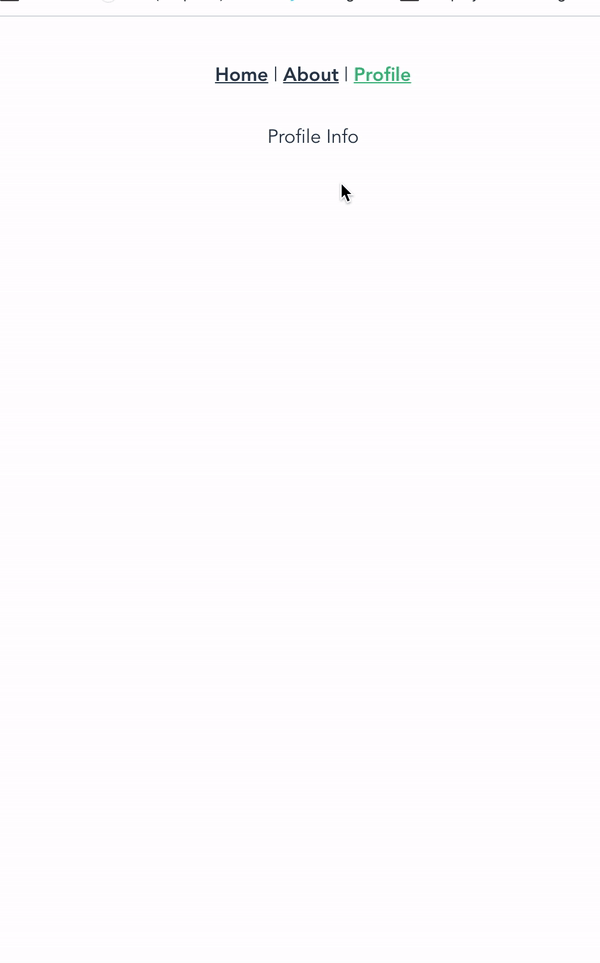
The <router-view> can be used to display the routing components based on the routes. When applied to an element in a template, makes that element a link that initiates the navigation to a route. Navigation opens one or more routed components in one or more <router-link> locations on the page. This means when we route to another view the application just hides some information and displays the requested information.
Profile.vue
Javascript
<template>
<div class="profile">
    <h1>This is a profile page</h1>
</div>
</template>
Step to run the application: Step to run the application: Run the server using the following command.
npm run serve
Output: Open your browser and go to http://localhost:8080/ you will see the following output.
Please write comments if you find anything incorrect, or you want to share more information about the topic discussed above